End Your Back Pain: 7 Secret Physical Therapy for Low Back Pain Exercises You Need Now!
- E. Slaieh
- May 28
- 11 min read

Did you know nearly 80% of adults suffer from lower back pain at some point? This is a huge number that shows how common this problem is. If you're one of the millions dealing with back pain, you're not alone.
Physical therapy for low back pain exercises can really help. These exercises target specific areas to ease pain, boost flexibility, and strengthen your back muscles. In this article, we'll look at seven exercises that can help you beat lower back pain and improve your life.
Understanding Low Back Pain and Its Impact on Your Life
It's important to know what causes low back pain to find relief and improve your life. This pain can come from muscle strain, bad posture, or health issues.
Common Causes of Chronic and Acute Back Pain
There are two types of back pain: acute and chronic. Acute pain happens suddenly, often from injury or strain. Chronic pain lasts longer and can be caused by things like degenerative disc disease or spinal stenosis.
Muscle strain or sprain
Herniated or bulging discs
Degenerative disc disease
Spinal stenosis
Poor posture or biomechanics
How Back Pain Affects Your Daily Activities and Quality of Life
Back pain can make everyday tasks hard, like bending, lifting, or sitting for a long time. It can also mess with your sleep, making you tired and less productive.
Back pain can change your life in many ways:
It can stop you from doing physical activities or exercising.
It can make you feel down and affect your mental health.
It can hurt your social life and relationships.
It can make you less productive at work or home.
The Science Behind Physical Therapy for Low Back Pain Exercises
Physical therapy for low back pain exercises is based on science. It offers a proven way to find relief and heal. By knowing how these exercises work with our bodies, we see their value.
How Targeted Exercises Relieve Pain and Promote Healing
Targeted exercises in physical therapy strengthen muscles that support your spine. They also improve flexibility and posture. This reduces strain on your lower back, easing pain.
Exercises like pelvic tilts and bridges strengthen your core and glutes. They also improve spinal stability, lowering injury risk.
Research-Backed Benefits of Consistent Physical Therapy
Many studies show physical therapy's effectiveness in managing low back pain. It reduces pain, improves function, and lowers surgery needs. It also teaches patients about proper body mechanics and posture.
This research highlights physical therapy's key role in treating low back pain.
Preparing Your Body and Space for Effective Exercise
Effective exercise for low back pain needs more than just the right moves. It also requires a prepared body and a safe place. As you start your physical therapy, understanding the importance of preparation is key.
Essential Equipment for Home-Based Physical Therapy
For home-based physical therapy, you'll need just a few tools. The right equipment can make a big difference. Here are some essentials:
A good quality exercise mat for comfort and stability
Resistance bands for strengthening exercises
A stability ball for core strengthening and flexibility
These tools will help you do lower back pain exercises well.
Creating a Safe Exercise Environment for Back Pain Relief
Creating a safe space for exercise is vital for back pain relief. Make sure your area is:
Clear of clutter to prevent tripping hazards
Well-ventilated for comfort
Quiet or has calming music to help you focus
By preparing your body and space, you're ready for success in your low back pain exercises.
Exercise 1:
Pelvic Tilts for Core Stabilization and Neutral Spine
Pelvic tilts are a key exercise in physical therapy for low back pain. They help stabilize your core and keep your spine neutral. This is great for those with lower back pain from strained muscles or bad posture.

Step-by-Step Instructions with Proper Form Guidance
To do pelvic tilts right, lie on your back with knees bent and feet on the floor. Put your hands on your hips to guide your pelvis. Tilt your pelvis up, then down, and keep doing it.
Make sure you're not arching your back or using your legs too much. The movement should be small, controlled, and focus on your pelvis.
Modifications for Different Pain Levels and Progressions
If you have really bad back pain, start with a gentle tilt without straining. As you get better, tilt more. For those who are more advanced, hold the tilt for a second to work your core more.
Common Mistakes to Avoid for Maximum Benefit
A big mistake is tilting too hard, which can hurt your lower back. Another mistake is not using your core, making the exercise less effective. Keep your movements slow and controlled, and focus on using your core.
Exercise 2:
Bird Dog for Spinal Alignment and Core Strength
Strengthening your core and improving spinal alignment are key to reducing lower back pain. The Bird Dog exercise is an effective way to achieve this. It targets the muscles that support your spine, enhancing stability and reducing discomfort.
Step-by-Step Instructions with Proper Form Guidance
To perform the Bird Dog exercise correctly, start on your hands and knees. Make sure your hands are directly under your shoulders and your knees are under your hips. Lift your right arm and left leg off the ground, holding them straight.
Hold this position for a few seconds, then return to the starting position. Repeat with the opposite arm and leg.
Maintaining proper form is crucial. Keep your back straight and your core engaged throughout the exercise.
Modifications for Different Pain Levels and Progressions
For those with severe lower back pain, a modified version of Bird Dog can be done by lifting only one limb at a time. As you progress, you can increase the duration you hold the position or add more repetitions.
Pain Level | Modification |
Severe | Lift one limb at a time |
Moderate | Hold position for 5 seconds |
Mild | Increase to 10 repetitions on each side |
Common Mistakes to Avoid for Maximum Benefit
A common mistake is allowing the back to arch or sag during the exercise. Maintaining a straight line from head to heel is essential for maximizing the benefits of Bird Dog and minimizing the risk of injury.
Exercise 3:
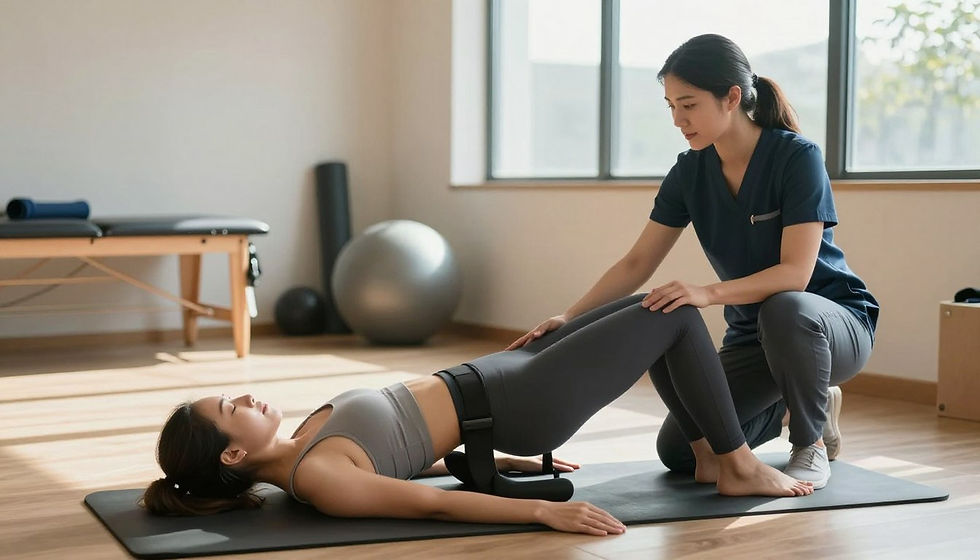
Bridges for Gluteal Strengthening and Lumbar Support
The bridge exercise is a simple yet powerful tool for strengthening your glutes and supporting your lumbar region. It targets the gluteal muscles, helping to alleviate low back pain and improve lower back health. This exercise is great because it can be modified to fit different pain levels and fitness goals.
Step-by-Step Instructions with Proper Form Guidance
To perform a bridge correctly, follow these steps:
Lie on your back with your knees bent and feet flat on the floor, hip-width apart.
Place your arms at your sides with your palms facing down.
Engage your core muscles by drawing your belly button towards your spine.
Slowly lift your hips towards the ceiling, squeezing your glutes as you lift.
Hold the position for a few seconds at the top, ensuring your body forms a straight line from shoulders to knees.
Slowly lower your hips back down to the starting position.
Modifications for Different Pain Levels and Progressions
Bridges can be modified to accommodate different levels of back pain and fitness. For those with severe back pain, starting with a supported bridge (using a Swiss ball or bench for support) can be beneficial. As you progress, you can increase the difficulty by lifting one leg or using resistance bands.
Modification Level | Description |
Beginner | Supported bridge using a Swiss ball or bench. |
Intermediate | Standard bridge with both feet on the ground. |
Advanced | Single-leg bridge or using resistance bands. |
Common Mistakes to Avoid for Maximum Benefit
To get the most out of the bridge exercise, avoid the following common mistakes:
Arching your back: Keep your spine neutral to avoid putting unnecessary strain on your lower back.
Letting your hips sag: Maintain control throughout the movement to effectively engage your glutes.
Not engaging your core: Failing to engage your core can lead to poor form and reduced effectiveness.
By incorporating bridges into your physical therapy routine, you can strengthen your glutes and support your lumbar region. This helps to alleviate low back pain.
Exercise 4:
Modified Planks for Core Stability Without Strain
Modified planks are great for keeping your core strong without hurting your lower back. They're a safer version of traditional planks. They work your core muscles without extra stress on your back.
Step-by-Step Instructions with Proper Form Guidance
To start a modified plank, lie on your forearms and knees instead of toes and hands. Make sure your forearms are parallel and your knees are under your hips.
Draw your navel towards your spine to engage your core. Keep a straight line from head to knees. Hold for 20-30 seconds, breathing normally. Increase time as you get stronger.
Modifications for Different Pain Levels and Progressions
If you have severe lower back pain, start with a higher support. Use a chair or bench under your forearms.
As you get better, lower the support until you're on the floor. For more challenge, lift one leg or arm off the ground.
Common Mistakes to Avoid for Maximum Benefit
A big mistake is letting your back arch or hips sag. This can hurt your lower back.
Another mistake is holding your breath. This can make your body tense. Keep proper form and breathe smoothly for best results.
Exercise 5:
Gentle Piriformis Stretches for Sciatic Relief
If you're feeling sciatic pain, try gentle piriformis stretches. The piriformis muscle in your buttocks can press on the sciatic nerve. This can cause pain and discomfort. Stretching gently can help ease this pressure.

Step-by-Step Instructions with Proper Form Guidance
To do a gentle piriformis stretch, follow these steps:
Lie on your back with your legs straight.
Bend the affected leg, crossing it over the other leg.
Place your hand on the knee of the crossed leg and gently pull it toward your opposite shoulder.
Hold the stretch for 30 seconds, feeling the stretch in the back of your leg.
Return to the starting position and repeat on the other side.
Modifications for Different Pain Levels and Progressions
If you have severe pain, try a modified stretch:
Use a strap or towel to gently pull the leg across the body.
Make the stretch less deep to avoid more pain.
As you get better, you can make the stretch deeper by:
Stretching for longer.
Pulling the leg further across your body.
Pain Level | Modification |
Severe | Use a strap; reduce depth |
Moderate | Hold for 30 seconds; gentle pull |
Mild | Deepen the stretch; increase duration |
Common Mistakes to Avoid for Maximum Benefit
To get the most from the piriformis stretch, avoid:
Stretching too hard, which can make the pain worse.
Not keeping your back flat on the ground, which can make the stretch less effective.
By following these tips and listening to your body, you can use gentle piriformis stretches to help with lower back pain.
Exercise 6:
Cat-Cow for Spinal Mobility and Disc Health
The Cat-Cow exercise is simple yet powerful. It helps improve spinal mobility and can reduce disc problems. It's great for those with low back pain, as it stretches and mobilizes the spine.
Step-by-Step Instructions with Proper Form Guidance
To do the Cat-Cow exercise right, follow these steps:
Start on your hands and knees (all fours), with your wrists under your shoulders and knees under your hips.
Inhale and arch your back, lifting your tailbone and head up (Cat Pose).
Exhale and round your back, tucking your chin and tailbone down (Cow Pose).
Do this for 5-10 repetitions, moving slowly and smoothly.
Modifications for Different Pain Levels and Progressions
If you have severe back pain, start with a modified Cat-Cow. You can reduce the motion or do it on a supportive surface. As you get more comfortable, you can increase the intensity and range of motion.
Pain Level | Modification |
Mild | Full range of motion |
Moderate | Reduced range of motion |
Severe | Minimal movement, supportive surface |
Common Mistakes to Avoid for Maximum Benefit
To get the most from the Cat-Cow exercise, avoid these mistakes:
Don't move too fast or jerkily, as it can hurt your spine.
Keep your hands and knees aligned properly.
Avoid forcing beyond what feels comfortable.
By adding the Cat-Cow exercise to your physical therapy routine, you can improve your spinal mobility and disc health. This can help reduce low back pain.
Exercise 7:
Controlled Hamstring Stretches for Lower Back Relief
Tight hamstrings can make lower back pain worse. Controlled hamstring stretches help relieve this pain. They reduce tension and aid in healing.
Step-by-Step Instructions with Proper Form Guidance
To do controlled hamstring stretches, lie on your back with legs straight. Lift one leg towards the ceiling, keeping it straight, until you feel a stretch. Hold for 15-30 seconds, breathe deeply, and then lower it back down. Repeat on the other side. Keep control to avoid injury.
Make sure your lower back stays on the floor during the stretch. If you feel sharp pain, stop and talk to a healthcare professional.
Modifications for Different Pain Levels and Progressions
If you have severe pain, bend your knee slightly as you lift your leg. This makes the stretch easier on your back and hamstrings. As your pain lessens, you can straighten your leg more, increasing the stretch.
Beginners: Bend your knee slightly to reduce strain.
Intermediate: Straighten your leg as much as comfortable.
Advanced: Hold the stretch for longer or increase the frequency.
Common Mistakes to Avoid for Maximum Benefit
Don't lift your leg too high or too fast, as it can strain your back. Also, keep your lower back pressed into the floor to stretch effectively. Slow, controlled movements and proper form are key to getting the most out of this exercise.
Implementing Your Physical Therapy Routine: Schedules and Progression
To help with low back pain, adding physical therapy exercises to your daily routine is key. A consistent plan can bring you a lot of relief from lower back pain.
Creating a Sustainable Weekly Exercise Plan
When making your weekly plan, think about your fitness level and how bad your back pain is. Start with short sessions and slowly make them longer as you get stronger. Try to exercise 3-4 times a week, with rest days in between to avoid too much strain.
Day | Exercise | Sets/Reps |
Monday | Pelvic Tilts | 3 sets of 10 reps |
Wednesday | Bridges | 3 sets of 12 reps |
Friday | Cat-Cow Stretch | 3 sets of 10 reps |
Tracking Progress and Adjusting Your Routine
It's important to track how you're doing to see what works for you. Use a journal or a mobile app to log your exercises and note any changes in pain or how well you can move. Change your routine as needed to keep challenging your muscles and helping them heal.
FAQ's About Physical Therapy for Low Back Pain Exercises
What are the most effective physical therapy exercises for low back pain relief?
Effective exercises include pelvic tilts, bird dog, and bridges. Modified planks, gentle piriformis stretches, and cat-cow are also helpful. Controlled hamstring stretches target different back pain areas, promoting healing.
How often should I perform these physical therapy exercises for lower back pain?
Do these exercises 2-3 times a week. You can increase frequency as your body gets stronger. Always listen to your body and adjust based on pain.
Can physical therapy lower back pain exercises be done at home?
Yes, many exercises can be done at home with little equipment. This makes it easy to fit them into your daily routine.
How long does it take to see results from physical therapy for low back pain exercises?
Results vary, but many see improvements in 4-6 weeks. Be patient and keep up with your routine.
Are there any risks associated with performing physical therapy exercises for lower back pain?
Yes, there's a risk of injury if you don't use proper form or push too hard. Always follow instructions and talk to a healthcare professional if worried.
Can I modify physical therapy exercises to suit my fitness level or pain level?
Yes, many exercises can be adjusted for different fitness or pain levels. Start with gentler versions and gradually increase as you get stronger.
How do I create a safe exercise environment for back pain relief at home?
Ensure a clear, non-slippery space and use a good exercise mat. Have necessary equipment nearby. Be mindful of your body's position and movement.
What are some common mistakes to avoid when doing physical therapy lower back pain stretches?
Avoid using wrong form, bouncing, or forcing stretches. Don't ignore your body's pain signals. Knowing these mistakes helps you get the most from your exercises.
Conclusion
You now have the tools to ease low back pain through physical therapy exercises. By doing the 7 exercises mentioned, you can make your back stronger and more flexible. This can also help reduce pain.
Physical therapy stretches and exercises can really help those with back pain. By sticking to a regular routine, you can see big improvements in your health and life quality.
Begin your journey to a pain-free back by adding these exercises to your daily routine. With regular effort and patience, you can find lasting relief. Enjoy a healthier, more active life.
If you have any questions or would like to share your experiences, please feel free to leave a comment below. Your feedback is invaluable, and together, we can support each other on this journey towards recovery.
The content on this website does not constitute a professional opinion, a recommendation, a substitute for consulting an expert or receiving medical advice from a care provider.

Comments